Using AI with Swift Missive for Free
Author: Dave Cline
Posted: 12/13/2025
Hi everyone!
We did this in our previous blog post as well, but it seems like we’re still getting bombarded with the same AI-related posts, so let’s try to get some of it out of our systems again... AI! AIAIAIIII! A I A I A I AIIIII! Ok, whew, much better, now I’m ready to move on from talk even more about AI.
This is, at least, less of a fluffy marketing post and more of a "here’s how you can connect free AIagentsto Swift Missive" post. We hope it helps some of you who are a little too cash-strapped to pay forour integrated AI Agent—we want everyone to have access to AI along with their email marketing campaigns!
Goals for this tutorial
After following the directions in this post, you’ll have an AI agent running on your system that is capable of doing almost anything that you can do with your Swift Missive account. The agent will chat with you to find out what you want to do, think about the best way to do it, and then execute your request as efficiently as possible.
Please note that while the options below are currently free, there is a limit to the number of chat-tokens you can use within the tool’s renewal period. Please see the documentation for the individual tools to figure out how to get more tokens, to find out when free tokens renew themselves, etc.
That being said, these options are still free and are still awesome! Pick whichever one suits you the best!
Option 1: Connecting AI via Cursor (easiest)
Cursor is a free IDE that contains a semi-free AI agent, that you can use to connect to our AI-enabled MCP server. Be sure to check their privacy policy and terms of service if you are worried about sharing information.
Step by step instructions
- VisitCursor’s websiteand download their installer.
- Install the IDE via the installer.
- Open Cusor and adjust any privacy settings that you want to adjust in there.
- Log into your Swift Missive account in anew tab.
- Within Swift Missive, navigate toAccount > Integrations
- If it’s not already selected, select "Cursor IDE" in the dropdown.
- Click the "Install in Cursor" button. This will tell your web browser to open up Cursor. You might have to give your browser permission to open the program since it lives outside of the browser.
- Once Cursor loads up, it will ask you if you want to install the Swift Missive MCP server. Click "Install" near the bottom. You will probably have to scroll down in Cursor to see the install button.
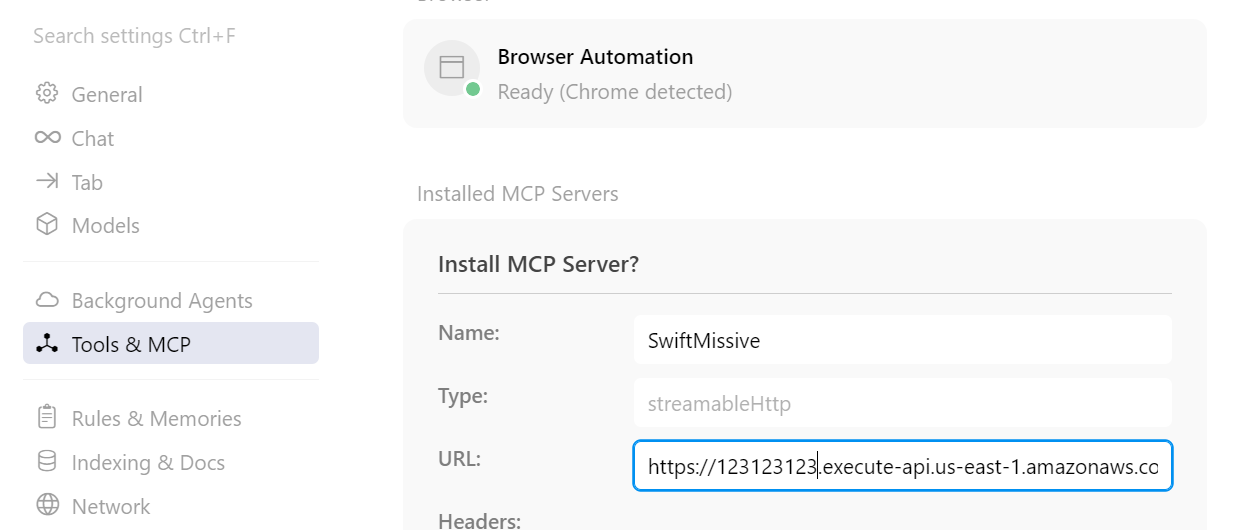
Image 1. Cursor asking if you want to connect to Swift Missive’s MCP server
- Wait for Cursor to finish examining its fun new Swift Missive tools.
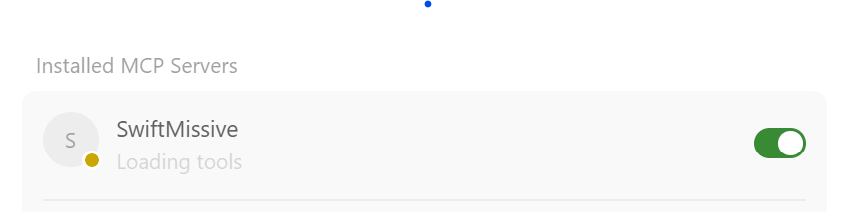
Image 2. Cursor integrating Swift Missive’s MCP server
- Open up Cursor’s AI agent with Ctrl+L (Windows) or Command+L (Mac).
- Make sure you are in "Agent mode".
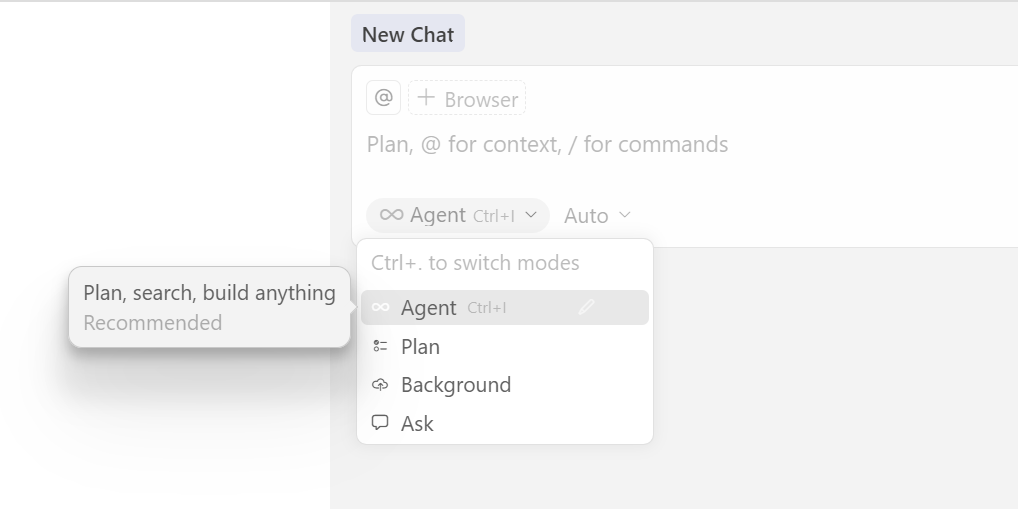
Image 3. Setting Cursor’s chatbox to Agent Mode
- Ask Cursor anything about your account! In case you are drawing a blank, here are some random ideas to get you started:
- What type of email campaign should I send next?
- How did my last campaign do?
- Let’s create a new segment with only our most engaged contacts in there.
- Let’s send a new campaign to our most engaged contacts.
- When Cursor’s agent wants to run Swift Missive MCP tools, it may ask you for permission first. As long as what it is asking to do lines up with what you were asking it, click "Run" when prompted.
Option 2: Connecting AI via the Claude desktop app
Claudeis a free (or semi-free) AI agent that you can use to drive your swiftmissive.com account. On Windows and Mac, the easiest way to connect it is our Claude desktop extension: a file you download from Swift Missive and open in Claude. Be sure to check their privacy policy and terms of service if you are worried about sharing information.
Updated October 2026: Claude no longer needs NodeJS or a config file to connect to our MCP server.
Step by step instructions
- VisitClaude’s websiteand install the Claude desktop app, then sign in and adjust any privacy settings that you want to adjust in there.
- Log into your Swift Missive account in anew tab.
- Within Swift Missive, navigate toAccount > Integrations
- Select "Claude (app)" in the dropdown.
- Click the "Download Claude extension" button. This downloads a swift-missive.mcpb file made for your account.
- Double-click the downloaded file and click "Install" when Claude opens it. (Or, in the Claude app, go to Settings, Extensions, Advanced settings, click "Install Extension", then choose the file.)
- When Claude asks for your Swift Missive API key, paste in the key from the "Copy API key" button on the Integrations page. Claude keeps it in your computer’s secure credential store.
- Ask Claude anything about your account! There’s nothing to paste first: the extension already knows where your account lives. In case you are drawing a blank, here are some random ideas to get you started:
- What type of email campaign should I send next?
- How did my last campaign do?
- Let’s create a new segment with only our most engaged contacts in there.
- Let’s send a new campaign to our most engaged contacts.
- When Claude wants to run Swift Missive MCP tools, it may ask you for permission first. As long as what it is asking to do lines up with what you were asking it, click "Allow" when prompted.
Option 3: Connecting AI via Claude on the web or your phone
If you use Claude in a browser or on your phone, you can add Swift Missive as a custom connector instead. There’s nothing to install, but you’ll paste a short message at the start of each conversation.
Step by step instructions
- Sign in toClaudeand adjust any privacy settings that you want to adjust in there.
- Log into your Swift Missive account in anew tab.
- Within Swift Missive, navigate toAccount > Integrations
- Select "Claude (web)" in the dropdown.
- Click the "Add to Claude" button. This opens Claude’s "Add custom connector" dialog with Swift Missive’s name and URL already filled in. (On Claude Team and Enterprise plans, only an Owner can add connectors, using the "Add for my Claude organization" button.)
- In that dialog, choose "No sign-in" for authentication. Then open "Request headers", choose the header name "x-api-key", and paste in the API key from the "Copy API key" button on the Integrations page. (If you don’t see "Request headers", Claude hasn’t turned that feature on for your account yet; use Option 2 instead.)
- Click "Add".
- In a Claude chat, click the "+" button, choose "Connectors", and make sure Swift Missive is turned on.
- Back on theAccount > Integrationspage, click the "Copy for Claude conversation" button.
- Paste the information you just copied into Claude’s chat box. It tells Claude where your account lives, and doesn’t include your API key.
- Ask Claude anything about your account! In case you are drawing a blank, here are some random ideas to get you started:
- What type of email campaign should I send next?
- How did my last campaign do?
- Let’s create a new segment with only our most engaged contacts in there.
- Let’s send a new campaign to our most engaged contacts.
- When Claude wants to run Swift Missive MCP tools, it may ask you for permission first. As long as what it is asking to do lines up with what you were asking it, click "Allow" when prompted.
Thank you for reading!
We hope this helps you get started with free AI Agents and email marketing with Swift Missive! Thanks for reading!