Event Triggered Emails
How to use Swift Missive with your company’s events to drive transaction and drip campaign emails.
Author: Dave Cline
Posted: 12/3/2023
Welcome to the Swift Missive blog!👋
Today I’m going to outline how you can use the Swift Missive API along with events from your company to trigger emails that go out to your contacts. Usually I get requests for this when people want to do one of the following:
- Send purchase receipts or password reset emails to their customers.
- Confirm newsletter subscriptions.
- Start their customers on a drip campaign, which will automatically email them at a later date. This is to help with:
- Customer retention / stickiness
- Return sales
- Brand recognition
- Product promotion via sales and discounts
The numbers back this up — leads who receive drip emails are 47% more sales-ready than those who receive only one-off blasts.
If you are interested in any of the above, read on!
Overview
Here is a super-simplified version of an event-triggered email-sending workflow.
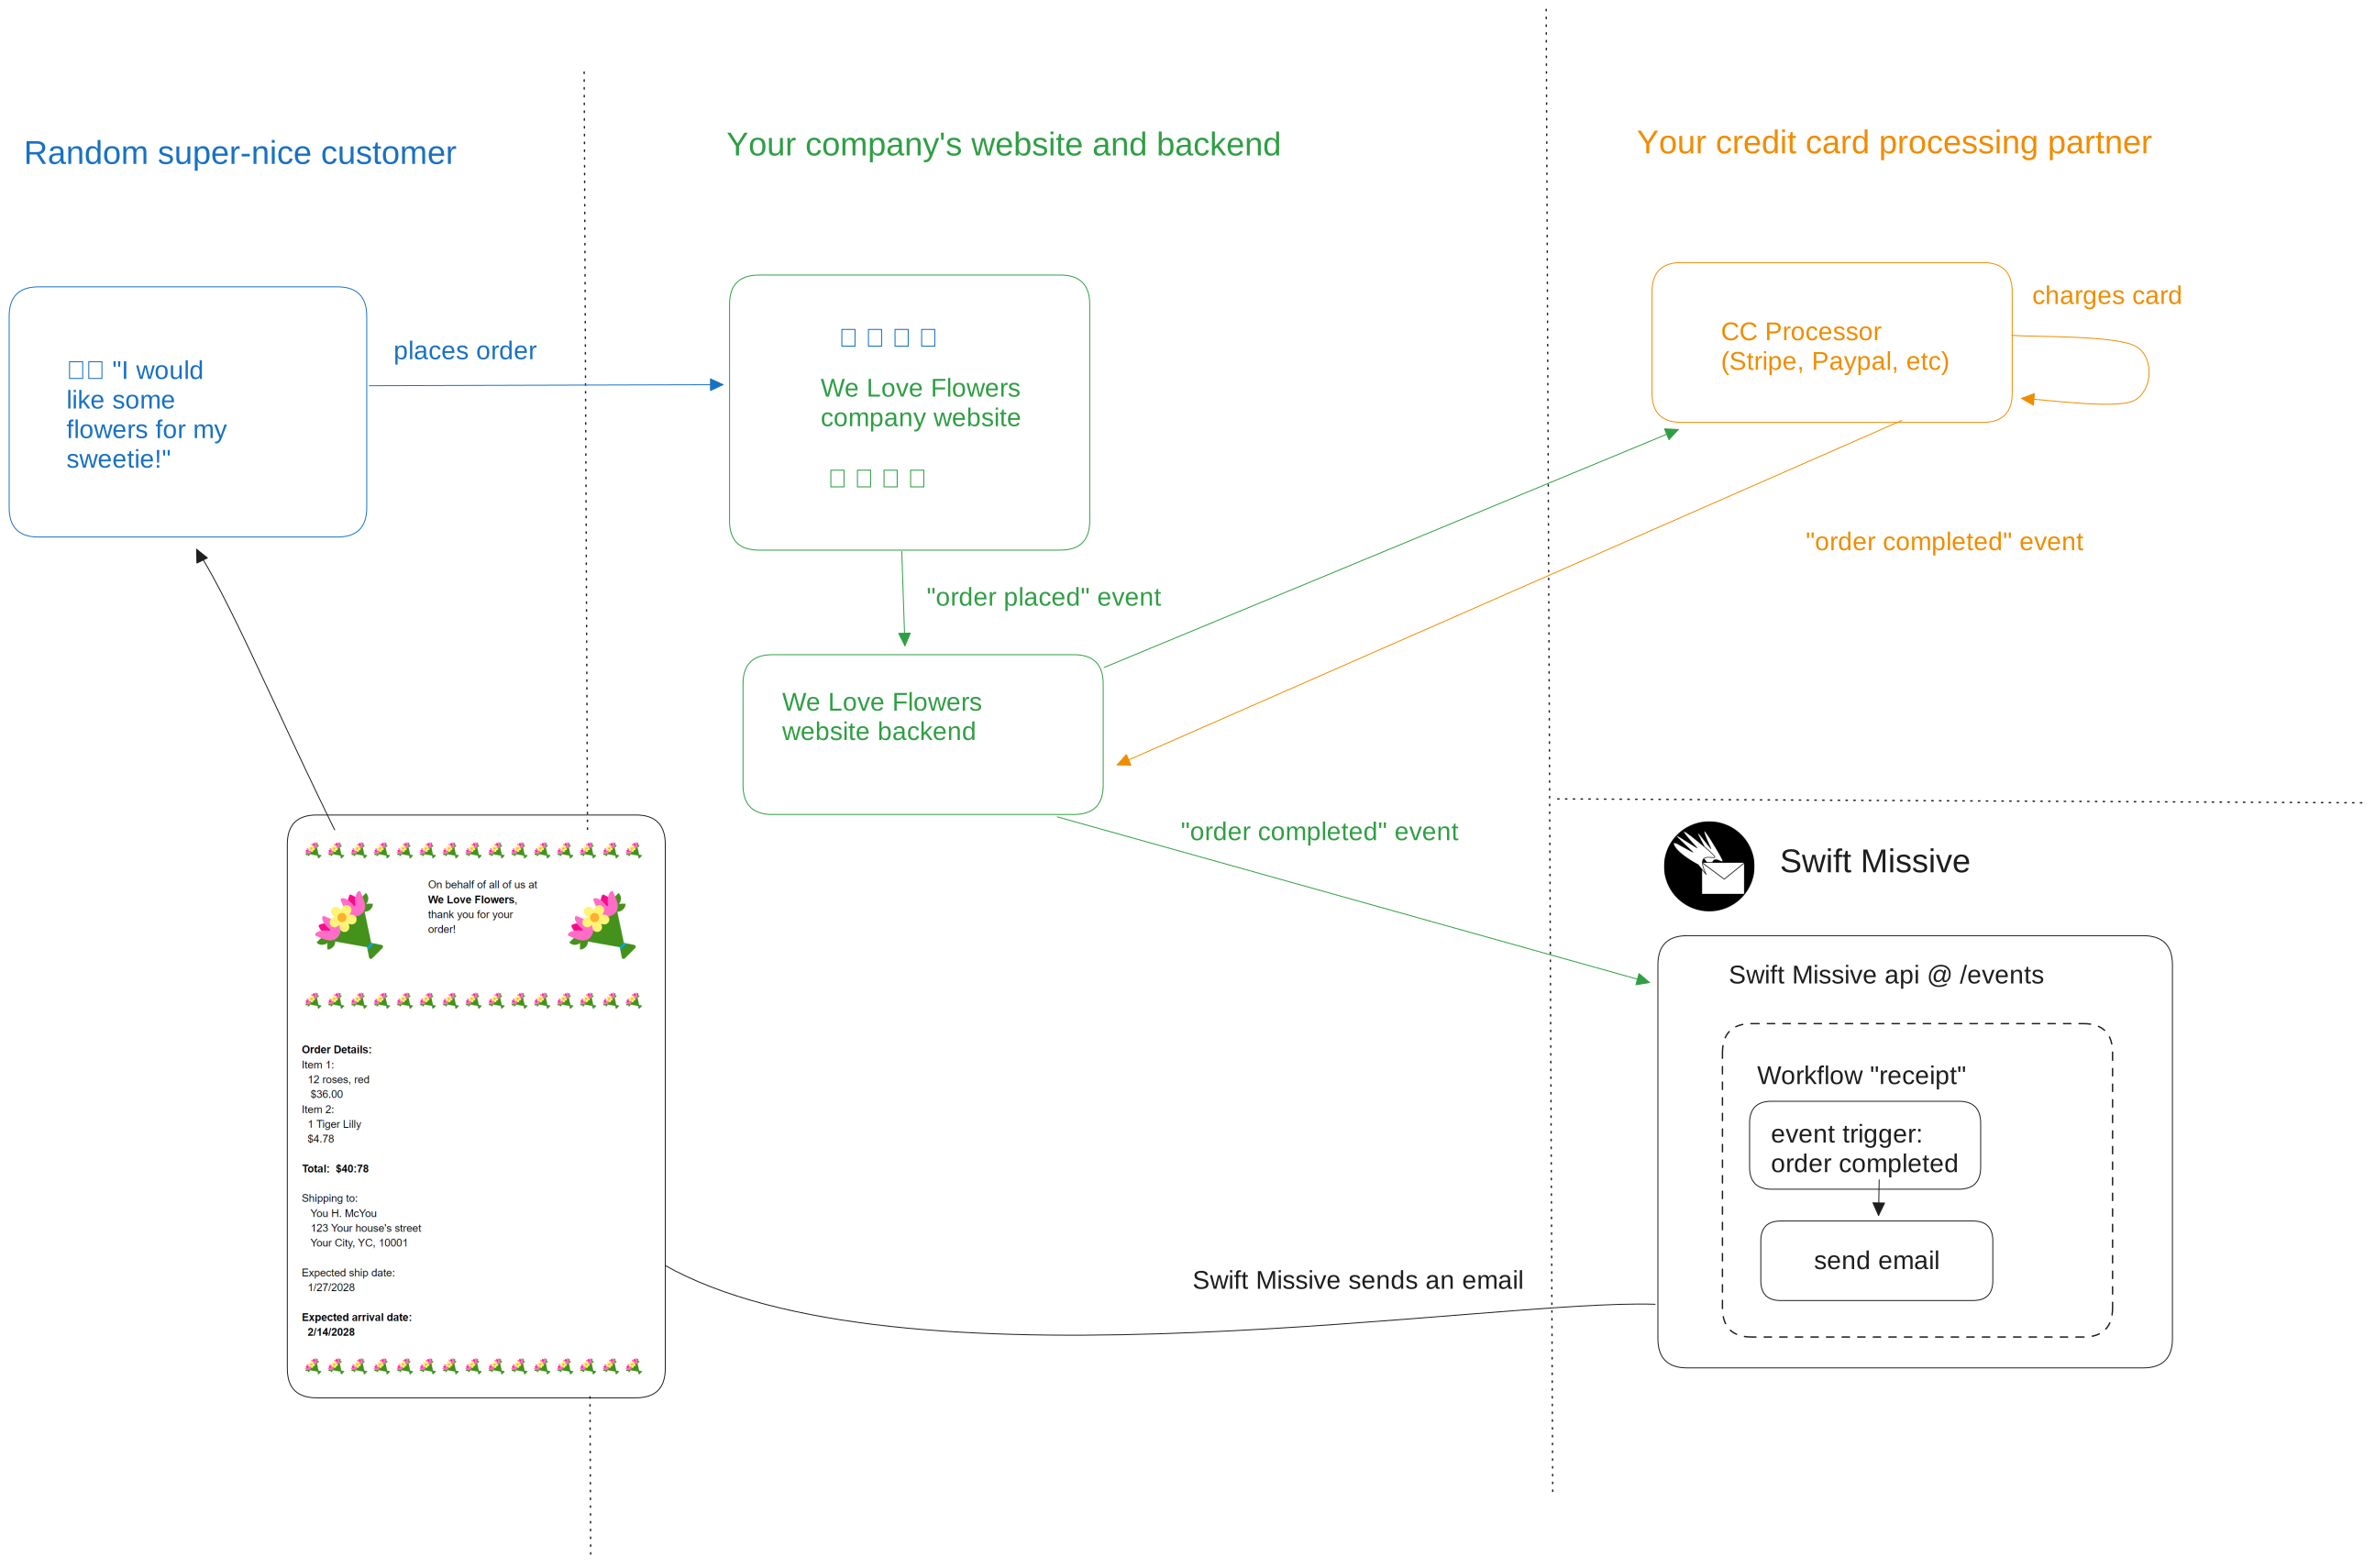
A nice guy orders flowers and receives a well-crafted email receipt
Here are the steps being outlined in the image:
- A customer visits your website to look for Valentine’s day flowers.
- They find a perfect bunch of flowers and order it.
- Your website sends the order event to your website’s backend processing code, which will process the order:
- Your credit card processor is asked to charge the customer’s credit card.
- Your credit card customer charges the card, then tells your backend code when it is done.
- Now that the order is complete, your backend code sends an event with the customers email to Swift Missive
- Swift Missive picks up the event and looks for any campaigns or workflows that are set up to handle that type of event. In this case the "receipt" workflow picks up the event and sends a receipt email with all the customer’s information in it.
- The "receipt" workflows template is rendered using the variables from the purchase event, and a lovely receipt email is sent to the nice guy who ordered flowers from your company.
I’m going to assume from here on that you already have a website that can process orders. If not, that’s probably a good first step, then return here once you’re ready to continue. Once you’re able to process orders, read the following steps on how you can send events to our system in order to trigger transactional and drip campaign email automations.
Preparing an "order complete" event
If you’ve used Stripe’s webhook system before, the concept is very similar — an event fires, your backend catches it, and then something happens as a result.
These steps can be a little bit tricky if you’re not comfortable with coding. For best results, make sure there is at least a level-seven nerd present when attempting these steps 🤓
Structuring an event
When we use the term "event", we are referring to a JSON blob of data that describes something that happened in the past. For Swift Missive events, the name of the event and the email of the person associated with the event should always be in the same spot. The data listed under the key "json" of each event’s data can take any shape you want, though. Here is an example JSON blob:
{
  "events": [
    {
      "name": "order complete",
      "email": "success+100@simulator.amazonses.com",
      "json": {
        "description": "12 roses, 1 tiger lily",
        "total": 40.47,
        "total_currency": "USD"
      }
    }
  ]
}
And here is a second example. Note that the information in under the "json" key is different in each example.
{
  "events": [
    {
      "name": "order complete",
      "email": "success+100@simulator.amazonses.com",
      "json": {
        "items": [
          {
            "sku": "flower2",
            "name": "tiger lily",
            "details": {
              "color": "orange"
            },
            "price": 4.78,
            "quantity": 1
          }
        ],
        "total": 4.78,
        "total_currency": "USD",
        "shipping": {
          "to": {
            "name": "Nice Guy",
            "address1": "123 Some Street"
          }
        }
      }
    }
  ]
}
What we’re seeing in the JSON blobs above is a description of an event that occurred when your customer ordered a flower. How that event is formed will be a little bit different depending on what your backend order-processing code looks like.
Constructing an event
Actually creating the json blob will also be a little bit different depending on the coding language that you backend order-processing code "speaks." Here are some examples of forming a JSON blob from an order in a few different languages:
GoLang
// Turn the order into a JSON event
eventJSON, _ := json.Marshal(order)

// Output the JSON text
fmt.Printf("%s", eventJSON)
Javascript / Typescript
// Turn the order into a JSON event
var json = JSON.stringify(order, null, 2);

// Output the JSON text
console.log(json);
PHP
// Turn the order into a JSON event
$orderJSON = json_encode($arr);

// Output the JSON text
echo $orderJSON;
Sending your event to Swift Missive
Now that you’re able to construct an event from your backend system, you’ll want to send it to your account’s endpoint in the Swift Missive API in order to trigger emails within our system.
Like most APIs, the Swift Missive API accepts HTTP POST requests to ingest events. The exact url you need to make a post to is different for each account. To find out what url you should send events to, sign in to Swift Missive and then navigate to the settings page. If you don’t have an account yet you can also try this out using the live demo.
Once you are on the Settings page for your account, look for the API endpoints section. There, you will see a URL where you want to post your events to, the HTTP method you want to use send the events (POST), the headers you need to send in the HTTP post, and a sample event that should look a lot the the JSON from the last section. We will need all of these components to send our event. Like the JSON formation we looked at in the last section, each backend language has a different way to send HTTP POST requests. Here are some examples:
GoLang
// Turn the order into a JSON event
eventJSON, _ := json.Marshal(order)

// Output the JSON text
fmt.Printf("%s", eventJSON)

// POST the event to Swift Missive
r, _ := http.NewRequest("POST", "URL FROM YOUR SETTINGS PAGE GOES HERE",
    bytes.NewBuffer(eventJSON))

// Set headers that the API server needs so it can make sense of our request
r.Header.Add("Content-Type", "application/json")
r.Header.Add("x-api-key", "THE API KEY FROM YOUR SETTINGS PAGE GOES HERE")

// Send the event!
client := &http.Client
_, _ := client.Do(r)
Javascript / Typescript
// Turn the order into a JSON event
var json = JSON.stringify(order, null, 2);

// Output the JSON text
console.log(json);

// POST the event to Swift Missive
await fetch('URL FROM YOUR SETTINGS PAGE GOES HERE', {
                method: 'POST',
                headers: {
                    'Content-Type': 'application/json',
                    'x-api-key': THE API KEY FROM YOUR SETTINGS PAGE GOES HERE
                },
                body: json
            });
PHP
// Turn the order into a JSON event
$orderJSON = json_encode($arr);

// Output the JSON text
echo $orderJSON;

// Prepare the request
$ch = curl_init("URL FROM YOUR SETTINGS PAGE GOES HERE");
curl_setopt($ch, CURLOPT_RETURNTRANSFER, true);
curl_setopt($ch, CURLOPT_CUSTOMREQUEST, "POST");
curl_setopt($ch, CURLOPT_POSTFIELDS, $orderJSON);
curl_setopt($ch, CURLOPT_HTTPHEADER, array(
  'Content-Type: application/json',
  'x-api-key: THE API KEY FROM YOUR SETTINGS PAGE GOES HERE'
));

// Send the request
curl_exec($ch);
As an easy alternative if you’re not ready to alter your backend code yet, you can try to use a tool like Postman to send your HTTP post instead of actual code like the above examples.
Triggering an email with the event
Hopefully by now you’re able to send events to your account’s API endpoint. Now it’s time for the fun part--let’s trigger an email!
Creating a template
The first thing we’re going to need to do is to create an email template. Let’s create a simple one on the templates page. Start out by naming your template, and then by setting its type to "transactional." Next, try drag-dropping some columns, and then some text into it. Maybe throw a cute dog in there if you have an image handy. 🐶
In order to use the fields from the event’s JSON blob, we’re going to need to use template variables in our text fields. These are simply values that are passed in and are associated with a certain key in JSON. For example, if our JSON was {"events":[{"name":"myevent"}]}, then a template variable of {{event.name}} would be replaced with myevent in the rendered email template. I’m eventually going send the first JSON event listed in this document to the Swift Missive api, so I created a test template using this text:
            Woof! Thanks for your order!

            Order description:  {{event.json.description}}

            Order total:  $ {{event.json.total}}
Just for fun I threw in some emojis and some AI-generated pupper images 🐶 Hey, this is looking pretty cute!
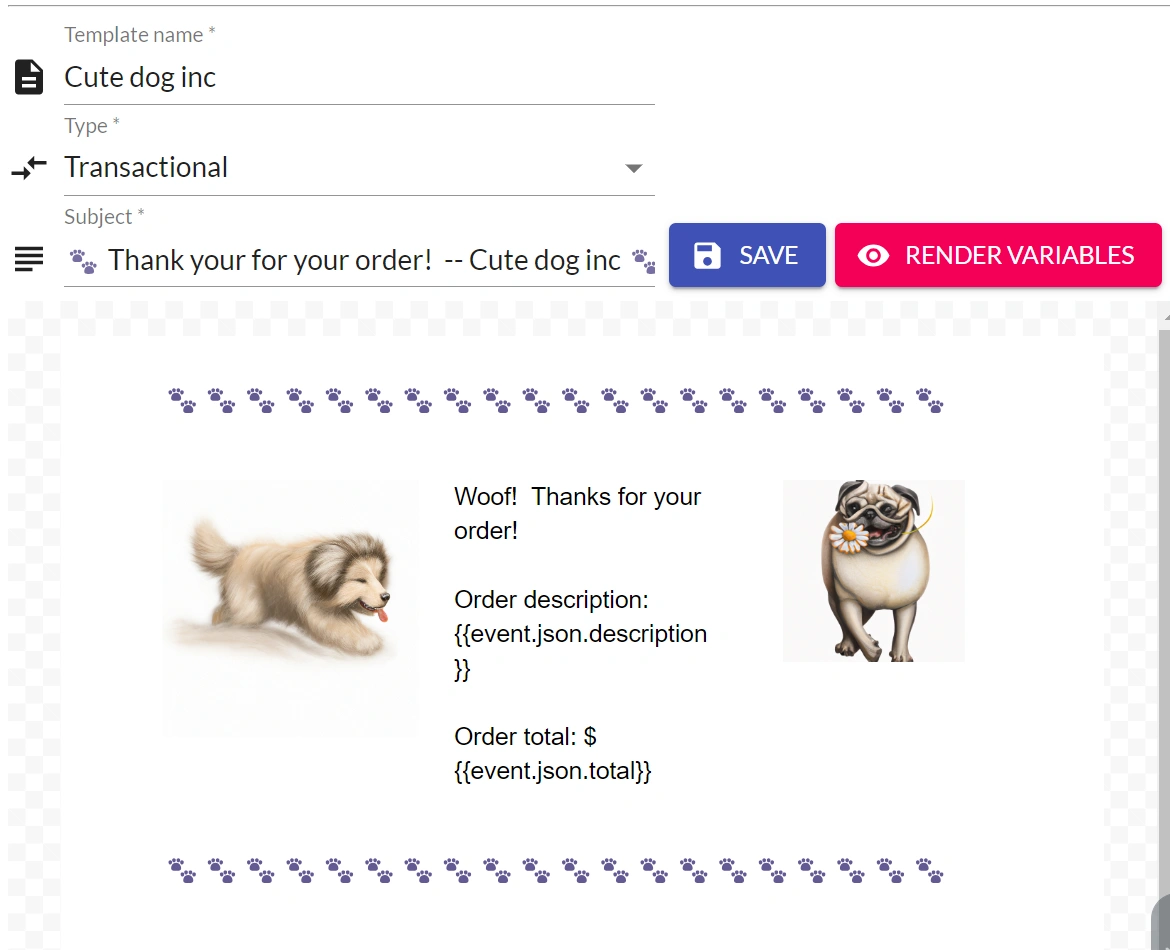
Our template inside the Swift Missive template editor, including two AI-generated dog images
Setting up a campaign
If you don’t have a sender persona set up yet, it’s probably best to create one now. Once that’s done, setting up a campaign will actually be pretty easy with the campaign wizard:
- When logged in, navigate to the campaign creation wizard.
- Select "trigger transactional emails with events from my company" and click Next.
- Name your campaign something clever and click Next.
- Enter the name of the event you’ll be sending the API. This will need to be the value associated with the "name" key in the JSON. For instance if the event JSON will look like this:
{"events":[{"name":"myevent"}]}then the name of your events is "myevent". Click Next after entering the name. - Select your sender persona and click Next.
- Select your template and click Next.
- Review your choices then click Next and then Launch. Please don’t close the page while it’s doing work.
- Once the success page pops up, the campaign is ready to receive events!
Triggering your new campaign
Once you have everything set up--a sender persona, email template including template variables, a campaign that is ready to receive those events and send templates, and your event sender itself--you should be ready to send some events and get some emails back! For testing purposes it may be wise to send your first few events as if a user with the email "success+100@simulator.amazonses.com" made a purchase on your site. That email receiver is provided by AWS and is intended to receive test traffic. Don’t worry, you’ll still be able see your rendered email to make sure everything is set up correctly by finding the contact and checking their recent emails list. By clicking on a recent email you’ll be able to see what was sent even if you don’t have access to the recipient’s inbox! Here is what our template looks like after I followed all the steps in this blog:
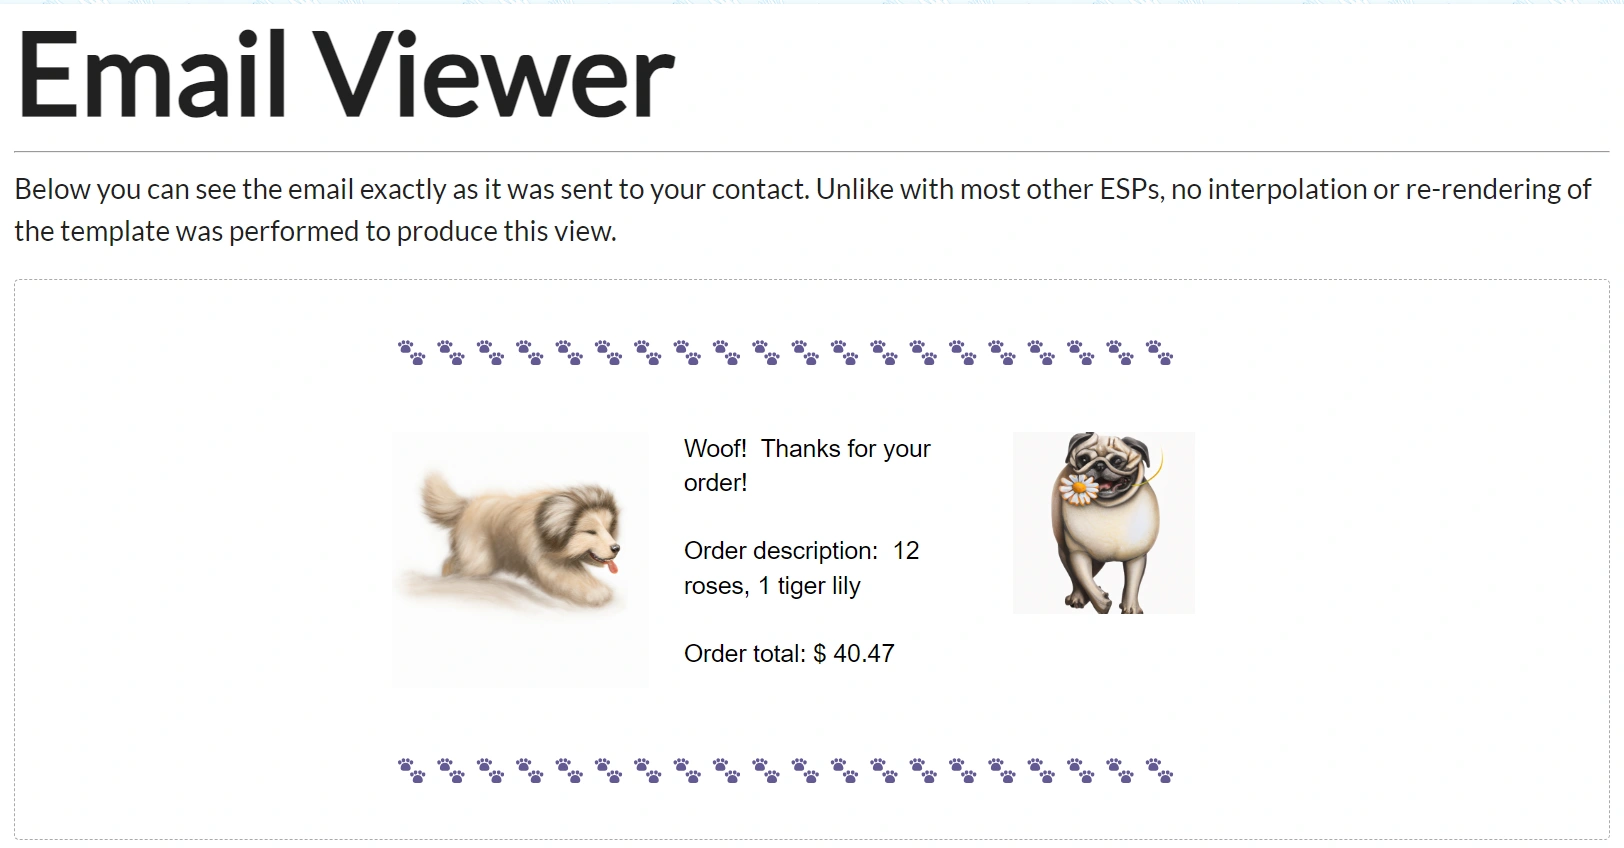
A perfectly-rendered and absurdly cute email receipt
Looks pretty good, huh? Give it a shot yourself if you haven’t yet! If you need some help, don’t hesitate to ask us a question or two! Probably the best way to do that right now is to use the contact us form. Happy coding everyone!